Creating Server
Node.js, Express.js, and MongoDB are frequently used in combination to create a backend for web applications
1. Node JS
2. Express JS
3. MongoDB
Node.js: Node.js allows you to write server-side code in JavaScript, providing a full-stack JavaScript development environment. This enables code reuse and consistency between the front-end and back-end, making it easier for developers to work on both sides of the application.
Express.js: Express.js is a minimal and flexible web application framework built on top of Node.js. It simplifies routing, middleware management, and handling HTTP requests, which speeds up development and allows you to create robust APIs and web applications with less code.
MongoDB: MongoDB is a popular NoSQL database that stores data in a flexible, JSON-like format (BSON). It's well-suited for applications where the data structure is subject to frequent changes, such as in startups or agile development environments. MongoDB is also highly scalable and can handle large amounts of data.
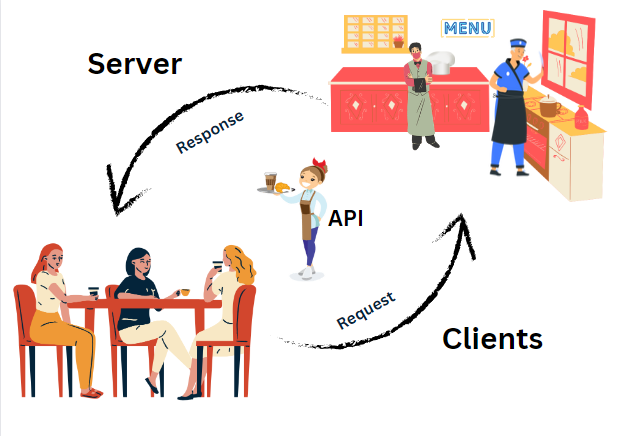
Introduction To API
An API Application Programming Interface is a set of rules and protocols that allows different software applications to communicate and interact with each other. In the context of web development, APIs are used to enable communication between the frontend (client-side) and backend (server-side) of a web application.
Frontend : The frontend, also known as the client, refers to the user interface of a web application that users interact with. It is responsible for sending requests to the backend and displaying the data received from the server.
Backend : The backend, also known as the server, handles the processing of requests received from the frontend. It performs various operations such as retrieving data from a database, executing business logic, and generating a response to be sent back to the client.
API : The API acts as an intermediary between the frontend and backend. It defines a set of rules and protocols for how requests and responses should be structured. The API takes the requests from the frontend, processes them, and transforms the data as required. It then sends the transformed data back to the frontend as a response.
How to manually create a package.json file for your backend project:
To manually create a package.json file for your backend project, you need to follow these steps:
Create a Project Directory: Start by creating a directory for your backend project. Open a terminal and navigate to the directory where you want to create your project.
Initialize the
package.jsonFile: Run the following command to start creating yourpackage.jsonfile:npm initYou'll be prompted with a series of questions to set up your project. Here are the prompts and explanations of what you can include:
- name: Enter the name of your project.
- version: Specify the initial version of your project.
- description: Optionally, provide a short description of your project.
- entry point: This should be the main JavaScript file for your backend, typically named
index.jsorserver.js. - test command: You can leave this empty for now.
- git repository: If your project is hosted on Git, you can specify the repository URL.
- keywords: Optionally, list keywords related to your project.
- author: Enter your name or the name of the project's author.
- license: Specify the license for your project (e.g., MIT, ISC).
Review and Confirm: After answering the prompts, the
npm initcommand will display the generatedpackage.jsoncontent for you to review. If everything looks correct, type "yes" and press Enter to confirm.Manually Edit
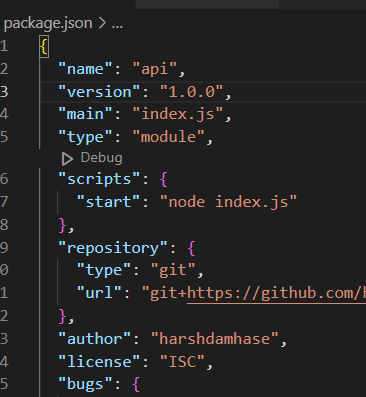
package.json: After confirming, thepackage.jsonfile will be created in your project directory. You can manually edit it to add or modify dependencies, scripts, and other project-specific details. You can use a text editor or code editor to open and modify thepackage.jsonfile.Here's an example of a minimal
package.jsonfile for a Node.js backend project:{
"name": "my-backend-app",
"version": "1.0.0",
"description": "A description of your project",
"main": "index.js",
"scripts": {
"start": "node index.js"
},
"author": "Your Name",
"license": "MIT",
"dependencies": {
"express": "^4.17.1"
}
}Install Dependencies: If you have any dependencies for your project, you can install them using the
npm installcommand. For example, to install Express.js, you can run:npm install express --saveStart Your Backend: With your
package.jsonand dependencies in place, you can start your backend server using the scripts you defined in yourpackage.json. For instance, if you specified a "start" script as shown in the example, you can start your server with:npm start
That's it! You've manually created a package.json file for your Node.js backend project and set up the basic structure for your project. You can continue to add more dependencies, scripts, and configuration as needed for your specific backend application.
You can create a package.json file for your backend project using npm init -y to accept the default settings
- npm init -y : This command initializes a new Node.js package in the current directory. The -y flag sets default options for all the prompts, allowing the initialization to proceed without requiring user input.
npm init -y
Create index.js This step involves creating an index.js file. The index.js file typically serves as the entry point of the backend application.
edit package.json : The package.json file contains metadata about the Node.js package and its dependencies. This step likely involves editing the package.json file to include necessary information about the backend application.
How to start a Backend App?
Open your terminal or command prompt to the root directory of your Backend app.
Run the Command
- Simply type the following command and press Enter:
npm start
- if you see this line in your
package.jsonfile:
"scripts":{
    "start": "nodemon index.js"
}
It means that when you run npm start, it's actually running the nodemon index.js command.
- Custom Script :
Sometimes, developers may customize the script name instead of using npm start. For instance, if your package.json looks like this:
"scripts":{
    "dev": "nodemon index.js"
}
Then, to start your app, you'd use the custom script name, which is dev in this example:
npm run dev
Express js:
Express.js is a popular JavaScript framework for building web applications and APIs. It simplifies the process of setting up a server and handling HTTP requests and responses.
Install express :
To install express, you can use the following commands:
npm install express
How to create server :
To create a server using Express, you need to write some code in your index.js file. Here's an
Example :
import express from "express";

const app = express();

app.listen(5000, () => {
  console.log("listening on port 5000");
});
In the above code:
- We import the express module and create an instance of the express application.
- The app.listen() method starts the server and makes it listen on port 5000.
- When the server starts listening, the callback function is executed, and it logs a message to the console.
Once the server is running, it can handle incoming HTTP requests from the frontend and send appropriate responses back.
HTTP Methods
GET
The GET method is used to retrieve data from a specified resource on a server. It is a read-only method that does not modify or update any data on the server. In the provided example, an Express server is created using the express package. When a GET request is made to the /students endpoint, the server responds with a JSON array containing student names. The res.json('students') statement sends the response with the string students as the data.
Example:
import express from "express";

const app = express();
app.get("/students", (req, res) => {
  res.json("students");
});
app.listen(5000, () => {
  console.log("Listening on port 5000...");
});
POST
The POST method is used to send data to the server to create a new resource or perform an action. It submits data in the body of the request to be processed by the server. In the provided example, when a POST request is made to the /student endpoint, the server extracts the name and roll properties from the request body. Then, it sends a response with a JSON object containing a success status and a message indicating the successful creation of a student with the provided information.
Example:
import express from "express";

const app = express();
app.get("/students", (req, res) => {
  const students = ["Saurabh", "Yogita", "Bandini", "Harshada", "Darshan"];
  res.json(students);
});

app.post("/student", (req, res) => {
  const name = req.body.name;
  const roll = req.body.roll;

  res.json({
    status: "success",
    message: `Student ${name} created with roll number ${roll}`,
  });
});

app.listen(5000, () => {
  console.log("Listening on port 5000");
});
Nodemon
Nodemon is a utility that automatically monitors changes in your source code and restarts the server whenever a change is detected. It is commonly used during development to save time and effort in manually restarting the server after each code modification.
To use nodemon, you need to install it globally using npm by running the following command in your terminal:
npm i -D nodemon
After installing nodemon, you can add it to the scripts section of your package.json file. The provided example adds a script called start to the package.json file. The script executes the command nodemon index.js when you run npm start. This means that nodemon will monitor the index.js file for changes and automatically restart the server whenever a change is detected.
Here's how the scripts section of your package.json file should look like:
"scripts": {
    "start": "nodemon index.js"
}
With this setup, you can conveniently start your server using npm start, and nodemon will take care of automatically restarting the server whenever you make changes to the code.